Grass fed steak Fajitas

I have been changing it up a bit in my diet lately as I have felt some plateauing and also some general discomfort in my tummy šŸ˜¦ I am pleased to say the discomfort seems to have gone away. I am going to give it a few months to see if it’s something that is working better for me as I get down to my last 15ish pounds that I would like to lose. I have been focusing more on grass fed, organic meats and healthy fats and organic veggies in my diet lately which led me to this gem last night.

As a side note, I very rarely follow recipes. I am sort of a fly by the seat of your pants kind of cook but it works for me. I learned it from my dad! So last night, I took stock of what I had in the fridge and I whipped this up. It doesn’t take too many special ingredients and it was awesome!

13119067_627766000705146_4657847635861707629_n

Grass fed Steak Fajitas (serves 1-2)

Ingredients:

1-2 grass fed sirloin strip steaks (you could also use ribeye)

juice of 1/2 lime

1/2 white onion, sliced

1 bell pepper, sliced

1 head of Boston, Bibb or Butter lettuce for wrapping (or tortillas if you prefer)

1 tbsp grass fed butter

1 tsp olive oil

salt and pepper to taste

1 tbsp taco seasoning rub

Taco Seasoning Rub:

1 tsp paprika

1/2 tsp smoked paprika or smoked chipotle chili

1 tsp chili powder

1/2 tsp oregano

1/2 tsp cumin

Directions:

  1. Preheat oven to 425.
  2. In a skillet or saute pan, heat 1 tsp olive oil over medium-high heat. Add onions and peppers and season with salt and pepper. Cook until onions are translucent and peppers are soft, approximately 5-7 minutes, stirring frequently.
  3. While vegetables are cooking, rub the steak with the taco seasoning rub and allow to sit for 10 minutes.
  4. In an ovenproof pan, heat butter over high heat. Add steak and sear on each side. Then add vegetables on the side of the steak in the pan and put the pan in the preheated oven.
  5. Cook to desired temperature (I like mine medium and it cooked about 10-12 minutes).
  6. Remove from oven and sprinkle with lime juice and allow to rest, covered loosely with aluminum foil, for 10 minutes.
  7. Thinly slice the steak and add to a plate with vegetable and separated lettuce leaves.
  8. Have fun making your own fajitas by playing the meat and veggies on the lettuce wraps. Feel free to add guacamole too but I had mine plain and it was great!

Ultimate Reset recipe: Squash with Garlic-Tahini Filling

I was intrigued by this recipe when it first appeared on my Ultimate Reset meal plan back in March. I like squash, I like tahini…wasn’t quite so sure what it would be like together. Well, ladies and gentlemen, I have one word for you:

Heaven.

This combination satisfies so many cravings, it’s crazy. It’s garlic-y and the tahini is almost peanut buttery. The squash is creamy. Really, it’s wondering and a great addition to any Meatless Monday meal plans out there.

This is so good I ate it for Easter dinner. See the picture below as proof…oh and ignore the cupcakes and chocolate….just walk right by those bad boys. But I digress, try this squash recipe. It’s divine and light and wonderful for summer. As an added bonus, the leftovers can be made into a yummy coconut squash soup! I love meals that can do double duty for me.

squash with tahini

Kabocha Squash with Garlic-Tahini Filling (makes 2 servings)

Ingredients:

Ā½ medium Kabocha or Acorn Squash, seeds removed

4 tbsp sesame tahini

2 tsp miso paste

1 tsp chopped garlic

2 tsp extra virgin olive oil

Directions:
Preheat oven to 400. Cut squash in half. Place squash halves on baking sheet lightly coated with spray. Combine tahini, miso, garlic and oil in a small bowl and mix well. Cover squash pieces evenly with tahini mixture. Bake for 30 minutes or until squash is fork-tender

Creamy quinoa with broccoli & tomatoes

Friends, think of this recipe as SOUPED up, SUPER HEALTHY mac and cheese. Oh, and did I mention it can be made allergen friendly (no dairy, no gluten, no eggs, not nuts)? Yeah, so there’s that and the creaminess paired with the quinoa and broccoli give it a comforting taste. I paired it with lots of vegetables to make a complete meal out of it. The best part of quinoa is that, for a grain, it’s got a ton of nutrients and it is a great plant-based source of protein! Give it a whirl…swap it out for your kid’s mac and cheese and you might be surprised at how well it is received!

IMG_20160408_164313215

Creamy quinoa with broccoli and tomatoes (yields 4 servings)

Ingredients:

1 cup cooked quinoa

1 head organic broccoli, chopped into large florets (discard stem)

10 cherry tomatoes, sliced

6 basil leaves, chopped

1/2 cup lowfat mozzarella cheese OR almond cheese shreds OR Daiya Dairy Free Cheese

1 tbsp grass-fed butter OR 1 tbsp olive oil

1/2 cup almond or cashew milk (unsweeened)…I made my own cashew milk and used that

salt & pepper to taste

Directions:Ā 

  1. Place broccoli in a steamer basket in a pan of shallow water. Cover with a lid. Bring water to a boil and steam broccoli for approximately 5-7 minutes or until tender but not soft. Remove broccoli from the steamer basket and chop into bite-sized florets.
  2. Dump water from your pan and return to the stove on low-medium heat. Add all ingredients to the pan and heat through, stirring constantly until the cheese has melted.
  3. Serve with a salad or steamed lemony green beans!

Baked Eggs with Spinach & Tomato

IMG_20160408_084719937

Look, it’s breakfast that tastes like pizza!! Say, whaaaa?

I know what you’re thinking? Eggs? Yes, today I tried to add some eggs into my meal plan. As I said the other day, I am slowly adding things back in when I find I crave them. Meat just isn’t something I have craved since the Reset so it hasn’t come back in. Eggs, however, are a different story so today I decided to try out a new recipe.

It was yummy, super filling and easy to make. This is a great recipe for Saturday morning brunch and I think even the kids will try it out and love it!

Baked Eggs with Spinach and Tomato (yields 2 servings)

Ingredients

4 eggs

4 cups baby spinach leaves

1/2 cup tomato sauce (make sure it’s natural with no sugar added)

2 tsp olive oil

salt and pepper to taste

1/2 tsp garlic powder

1/2 onion, diced

1/4 cup cheese or dairy-free alternative (I used TJ’s almond cheese which is awesome BTW)

Directions

  1. Preheat oven to 350.
  2. Heat oil in an ovenproof pan (stainless steel and cast iron are your best bets) over medium-high heat. Add onion and cook for 5 minutes or until translucent. Add spinach, salt and pepper and garlic powder and saute for 2 minutes.
  3. Make 4 holes in the spinach. This is where you will place the eggs.
  4. Crack 1 egg into each opening in the spinach mixture.
  5. Spread tomato sauce throughout the spinach mixture (it’s OK if it gets on the eggs too). Sprinkle with cheese.
  6. Place in oven and cook for approximately 10-15 minutes or until cheese is melted and eggs are cooked through to your liking (if you prefer them a little runny, check them earlier)


Vegan-ings and Intermittent Fasting

IMG_20160403_085050009Good morning world! I am about 2 weeks post-Reset and I am STILL eating vegan. I did add eggs twice but I didn’t love the way I felt afterwards so I decided to take them back out. I want to be clear, my decision to eat vegan right now is really to find out the best way to fuel my body. It’s a personal decision and it is a bit more work for me but if it helps with some of the issues I have had in the past, I will continue to the best of my ability. I am not perfect and I am sure there will be some days where I really want a hamburger but for now, those days are not overwhelming so being vegetarian (and even more specifically, vegan) hasn’t been that hard yet. Eating out isn’t as easy. I am heading to a Gala Auction this weekend for my son’s school and I am not so sure what I will be able to eat but I can plan in advance for that so I’m not worried.

Another thing I wanted to mention is that I have been reading and listening to a lot of podcasts lately about a phenomenon known as Intermittent Fasting. There are a few different ways to do this but the research behind it is about your body being able to tap into its fat stores more often when you are in an extended fasting state. For some people, this means fasting for a day or two and then eating. I’m going to be totally honest with you…I can’t do that. So, what works for me? I eat during an 8 hour window throughout the day and then I fast during 16 hours (to be fair, I am sleeping during 7 of those hours…or 5 on a bad night like last night šŸ˜¦ ) I decided to try this because I was basically already doing this throughout the Ultimate Reset. What hours work for me? 9-5. This is mostly because I am awake so early in the morning and I workout in the morning that I can’t make it much later than 9AM before breakfast.

I will be sharing more with you about this journey but what I am hoping to do is bring my results to the next level while fueling my body in the best way possible. Summer is coming and while it isn’t all about how I look, I have a goal to wear my bikini again and to feel more comfortable in it!

So tell me, would you try intermittent fasting? Would you like to know more about it?

And, as a BONUS, here’s a sample vegan meal plan from me!Ā VeganMealPlanusingIntermittentFastingeatingfor8hourwindowduringthedayfastingfor16hours


Breakfast simplified

Most mornings I have my shake for breakfast but sometimes I want something else so I save my shake for lunch or dinner. Today may be just one of those days since it is set to be a packed day with 2 services to sing at and not much down time in between! The other day I shared some overnight oats that I had made with you all so I figured I would also share the recipe. This is the perfect solution if you are on-the-go a lot in the morning because you can make a few little jars on Sunday night and have breakfast for the first few days of the week. You can even choose to top them in different ways depending on your mood that morning. I will share some of my favorite toppings with you at the end of this post. But, first let’s get down to the meat and potatoes of the recipe. I should also mention, this is a larger serving so if you are doing the Fix, it’s going to count as 2 full yellow containers for the day.

Overnight Oats (yields 1 serving)

Ingredients:

1 cup old fashioned rolled oats

1/2 tbsp chia seeds

1/2 tbsp hemp seeds

3/4 cup filtered water

1/3 cup unsweetened cashew milk (I have started making my own…super easy and no preservatives!)

1 tsp raw honey or pure maple syrup (Grade B is best)

10 drops stevia (optional)

2 tsps cashew cream (again, I made my own here)

Directions:

Place the oats in a container and top with water, honey, stevia, cashew milk and cashew cream (in that order). Allow to sit in the fridge overnight (or even a day or two if you are making a few at a time).

Variations and Ā Topping Options:

Lemon Blueberry Oats: Top with blueberries and some lemon zest

Apple Pie Oats: Add 1 tbsp chopped walnuts and 1/2 cup chopped apples and a dash of 12705339_10102300947155257_2414363839532544281_ncinnamon

Chocolate Cream Oats: Add 1 tsp raw cacao and 1 tsp dark chocolate chips

Peaches and Cream: Add 1/2 cup chopped peaches

Tropical Paradise Oats: Add 1/2 cup diced papaya, 1/2 cup diced pineapple and 1 tbsp unsweetened shredded coconut


Baked Truffle Balls

IMG_20160323_093240137
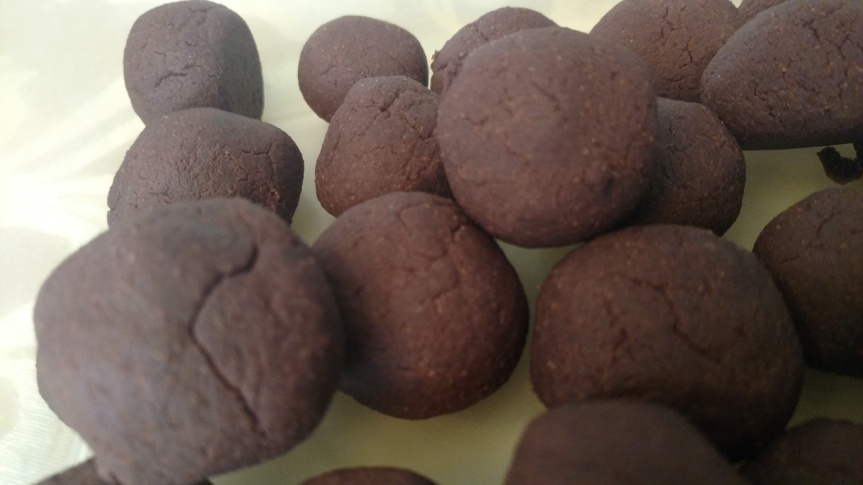
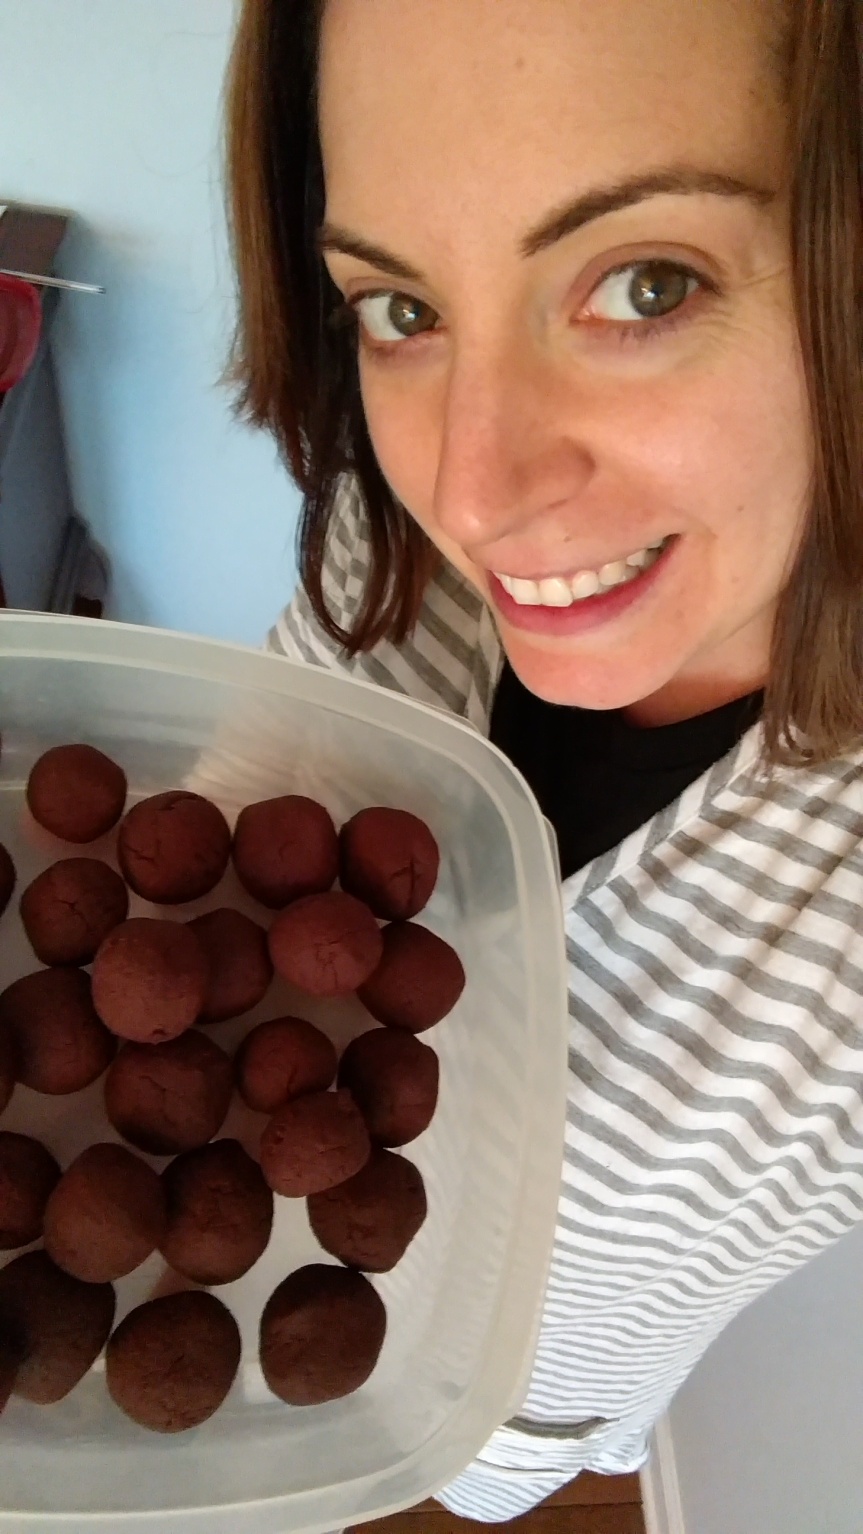
This morning I set out to make a healthy option to bring to a Kindergarten playdate this afternoon for my son’s class. I know there are dairy and nut allergies in the classroom so I needed to stay away from that and I decided to also go gluten free. What generally happens when I decide to bake something at the last minute is that I end up just opening my cabinets and kitchen drawers to see what I have. I discovered a bar of unsweetened baking chocolate and that became my focus. These cookies are a cross between a brownie and a truffle and they are gooooooooood.

Go to the kitchen and make these today!!

Baked Truffle Balls (yields approximately 24 cookie balls)IMG_20160323_095146520

Ingredients

1/3 cup raw cacao powder

1/3 cup coconut flour

1/2 cup rice flour

1/2 cup garbanzo bean flour

1 tsp baking powder

1/4 tsp pink Himalayan salt

dash of cinnamon

1/4 cup canned coconut milk

1/3 cup coconut sugar

1/3 cup grade B maple syrup

20 drops stevia

1/4 cup coconut oil

3 oz unsweetened chocolate for baking (get the best quality chocolate you can), chopped

Directions:

  1. Preheat oven to 350.
  2. Combine cacao, coconut flour, garbanzo bean flour, salt, baking powder, rice flour and cinnamon in a large bowl.
  3. In a separate bowl, whisk together coconut sugar, coconut milk, maple syrup and stevia.
  4. Combine chocolate and coconut oil in a heat-proof bowl or double boiler and set over a pot of boiling water. Stir frequently until oil and chocolate is completely melted. Remove from the heat and add to the sugar mixture. Stir until completely combined.
  5. Add the wet ingredients to the dry ingredients until well mixed. Form into little balls and place on cookie sheet.
  6. Bake for 12-15 minutes. Do not overbake. Be careful to allow to cool and not touch too much as they will be fragile just out of the oven.

The Ultimate Reset: A Summation

Today marks the first day after my 21 days of The Ultimate Reset. I set out to do this program as a cleanse: to detox my body of all the yuckiness that comes from not making healthy food choices. It is described as a workout for your insides and that is definitely an accurate decision. There were times when I felt aches and pains from inside that seemed odd to me but were just a part of the process of my body resetting itself. Here are some of my thoughts from the past 21 days and how I am moving forward after this:

1st day of the Ultimate Reset- March 1st

  1. The program moved in stages so I was gradually cutting food out until the final week was pretty much just veggies and fruit and healthy fats. The transition out of the program should be the same. I didn’t actually account for the transition period when I first decided to do the program so it is butting up against some celebrations/holidays (ehem, Easter) but I am so happy about the way I am feeling, I don’t even mind missing out on coconut custard pie.
  2. When you remove meat and sugar from your diet, you don’t crave it. You don’t even miss it…not even a little bit. I am amazed that the things I craved were simple: peanut butter (I eat natural peanut butter with no sugar), eggs, oatmeal (I could eat it in Stage 1 but not beyond that) and my daily Shakeology which was reduced to a half serving each day and some days none at all.
  3. Today’s meal plan: I am keeping it simple today and close to the previous days: Breakfast was fruit salad with walnuts, snack was vegan chocolate Shakeology with peanut butter, lunch was hearty vegetable miso soup and Moroccan carrot salad over mixed greens, afternoon snack was 2 pitted Medjool dates and green tea and dinner is roasted beets, coconut collard greens and 2 pieces of baked tempeh (I found a tempeh that I like, hurrah!)
  4. How I felt: Week 1 was tough. I had classic symptoms of cleansing like headaches, body aches, fatigue (I went to bed at 8PM almost every night that week), brain fog and cramping/pain in my lower abdomen. It was definitely tough on those days but I took it easy and gave myself a break. I allowed myself to go to bed early and to rest. Week 2 was easier and Week 3 even easier although I did feel a bit hungry on some days during Week 3. I determined I was not drinking enough water and fixing that took care of my hunger.
  5. Doing a program like this is transformative. It makes you rethink the food you eat. I am not saying I am going to be fanatical about it…I need to live too but I am saying that eating like this made me feel better inside and out than I have eating in any other way so I will be working to keep most of the principles of the program in my life when planning meals. Today I spent some time during meal prep making some of my favorite recipes from the Reset.

Now that it is over, I am moving on to my next workout program but haven’t yet decided what it will be. I am going to be doing some sample workouts from each this week and will post. Will you help me decide?

Would you be brave enough to take on a program like The Ultimate Reset? Most of us think it’s too hard and we won’t have the willpower. The thing I found amazing is that it didn’t even take willpower. I knew what I was going to be eating and I planned and packed for every occasion. Sometimes it was annoying but I never felt like I was missing out. When I get together for dinner with friends, it isn’t the food that’s important, but the company!

So, at the end of 3 weeks, I lost 7 lbs and 7 inches overall and I have a ton more energy and am ready to take on the next challenge!

Crockpot Teriyaki Chicken

This recipe couldn’t be any easier. It features the crockpot, the busy person’s favorite invention. Let’s face it, some days are too busy to stand over the stove or some days you just don’t want to. It’s also a crowd pleaser! I made it this week for a friend’s family and they loved it! I love making food for friends, it’s an easy way to help a friend who’s busy or stressed or been through a rough time or thank them for everything they have done for you. I was blessed to receive meals when little Miss K was a baby and it was the most amazing gift to know that dinner was taken care of and one thing was off my plate!

As a side note, ginger is quickly becoming one of my favorite, most versatile ingredients in my cooking. I keep it in my refrigerator at all times because it works in tea, in savory dishes and in sweets!

jtq1315211680.20972822_sq_thumb_m

Crockpot Teriyaki Chicken (serves 4)

Ingredients:

2 tbsp plus 1 tsp sesame oil, divided

1/2 medium sized onion, diced

4 chicken breasts (can be fresh or frozen)

1/3 cup Bragg’s Liquid Amino’s

1/4 cup coconut sugar

1 inch long piece of peeled, fresh ginger, grated

juice of 1/2 lemon

1 green onion, sliced thinly

1 head of broccoli, cut into florets

2 tbsp toasted sesame seeds

Directions:

In a saute pan over high heat, add 1 tsp sesame oil and saute onions until translucent. Transfer onions to crockpot and add chicken, Liquid Amino’s, coconut sugar, ginger, and lemon juice. Cook on low for 8 hours or high for 5-6 hours (may need longer if you start with frozen chicken breasts). Approximately 1/2 hour before you plan to serve your meal, add the chopped broccoli florets to the crockpot and cook in the juice/sauce until tender. Plate and garnish with green onion and sprinkle with toasted sesame seeds. I served it over rice and it was delicious. So delicious in fact that I didn’t get a picture!

Shamrock Shake Fakeout

Well, I promised you this one yesterday and here it is! It’s St. Patrick’s Day which was never really a huge deal in our house growing up (we celebrated St. Joseph’s two days later with zeppole but I digress…) Although I can’t indulge in this recipe because I am following the meal plan for the Ultimate Reset, I did try it out a few months ago and it was delish. Skip that MacDonald’s Shamrock shake, goodness only knows what’s in it…definitely nothing of any nutritional value. My version is packed with healthy fats, iron and superfoods. Let me know what you think when you try it!

12226883_10102097702768637_237470262_n

A Better Shamrock Shake

Ingredients:

1/2 cup unsweetened cashew milk

8 oz. water

1/2 cup frozen spinach

1/2 ripe banana

1 tsp natural peanut butter or 2 tbsp powdered peanut butter (like PB2)

1/2 tsp pure mint extract or 1 1/2 tsp chopped, fresh mint leaves (even better!)

1 scoop Vanilla or Greenberry (if using greenberry, omit spinach and add 8-10 ice cubes instead) Shakeology

1 tsp pure, grade B maple syrup or raw honey

Directions:

Blend until creamy and frothy. Easy, peasy, lemon squeezey. Enjoy!